Publish WebMI Pages 
See also: Web Options
See also: User Access Level Editor

|
Create Webpages |
Publish WebMI Pages Configuration
To publish WebMI Pages is to trigger Cscape to convert the user-created screens into HTML5 based web pages and save those pages to the PC hard drive. A secondary step included in the publishing process is to transfer the published pages via FTP over Ethernet to the OCS/microSD.
Publishing does not technically require that Cscape be connected to the OCS controller and does not require that the OCS be connected to the PC via Ethernet. However, by default Cscape expects that both of these connections are made prior to publishing. To avoid ‘No Connection’ warnings and extra steps, it is more efficient to establish an Ethernet connection to the OCS with FTP configured and be connected to the OCS with Cscape by any of the connection methods: serial, USB, or Ethernet.
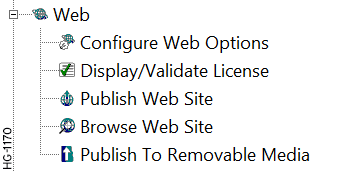
Webmi options can be accessed under web of project navigator

Selecting Publish Web Site, opens the following window:
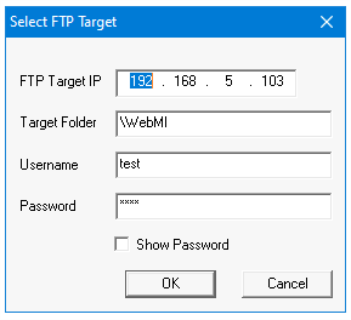
The Select FTP Target dialog pops up first. Enter the IP address assigned in the OCS controller. The default Target Folder is \\WebMI, which should be left as is. Enter the Username and Password that is setup in the FTP configuration in Home > Controller > Hardware Configure > LAN Config.
Select OK after making the configuration and a progress bar will appear to create the SVG files.
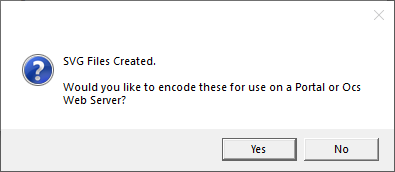
Now that the WebMI files have been published, you have two options for transferring the files to the Web Server (the OCS controller). You can transfer files via FTP, or you can manually transfer the files. Cscape now asks if you would like to transfer the files to the Web Server via FTP. Click Yes to continue or if manual transfer is desired, click No to cancel the operation.
After the files are created, the following message box appears:

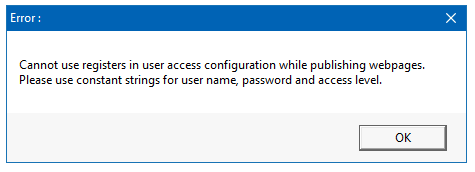
Selecting Yes publishes website if proper user access (i.e., constants) is configured in user access configuration. This dialog box closes itself after publish.
If user access is configured as not registered, then the following error message appears:
After website is published, asks for FTP the files to the server.
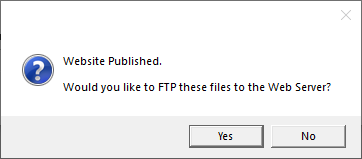
Selecting Yes starts FTP and the files are copied to the microSD card of the device.
![]()
Return to the Top: Publish WebMI Pages
Manual File Transfer
After encoding the SVG files for use with WebMI, the web pages are now published, but not yet sent to the OCS/microSD. Cscape automatically places published files in the Windows My Documents folder at this default location shown below.
Webpage SVG File Location: C:\Users\User name\AppData\Local\Cscape\Instance001\Program001\Cscape\SVGExport and Cscape\

To transfer the files manually, install the microSD card into the PC. Copy the WebMI folder and paste it into the root directory of the microSD card. Then remove the microSD card from the PC and install it into the OCS controller.
Return to the Top: Publish WebMI Pages
Use FTP to Transfer Files
When Cscape asks ‘Would you like to FTP these files to the Web Server?’ click ‘Yes’. Cscape will then transfer the files via FTP.
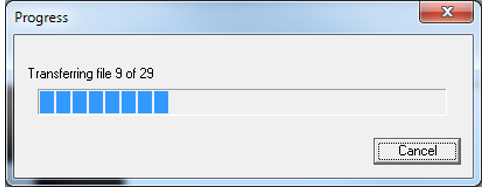
See Below: FTP progress of a test program containing one screen. A larger program with several configured screens will have more files to transfer.
Return to the Top: Publish WebMI Pages
Launch Web Site 
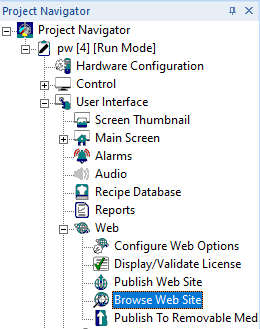
To launch the website from the OCS Web Server, enter the IP address of the OCS in the address field of a web browser such as Chrome, Microsoft Edge, or Firefox. If you can Ping the OCS from your ,then you have a valid Ethernet connection and should be able to launch the page. Alternately you can launch the OCS Web Server from Project navigator > web > Browse web site.
When you first type in the IP Address of your OCS in your web browser or launch from Cscape, a connection procedure is initiated.
Step 1: Go to Project navigator > web > Browse web site.
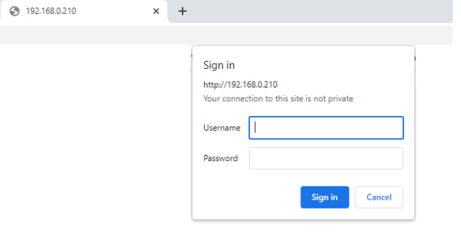
Step 2: Username and Password credentials are requested and authenticated. These are the credentials you created in the User Security Configuration. This ensures that only authorized personnel can access the web pages and allows different access levels to be granted to users of different capability.
Selecting Browse Web Site opens the web pages in default browser and asks for user credentials. Give the user credentials configured in Cscape: Project Navigator > User and Security
Step 3: After giving the correct user credentials, clicking on OK takes you to the License agreement page where the user needs to accept the license and then continue to view the pages.
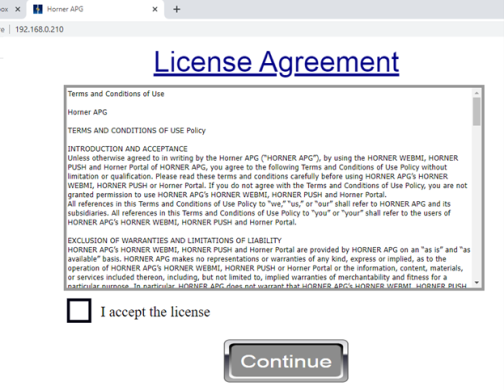
The WebMI Usage License is accepted by the user. With a basic connection now established – the WebMI server in the OCS “serves up” graphics information along with a JavaScript Applet which runs on the browser as a WebMI Client. This provides the browser with everything it needs to know in order to draw the default OCS web page. The WebMI Client (JavaScript Applet running on the browser) and WebMI Server (running on the OCS) agree upon a connection timeout. This is the value that is set in Cscape: Connection Time Out interval (sec)
Step 4: The WebMI Client and WebMI Server go into data communications mode – where only the following messages are exchanged over the network – saving bandwidth:
-
Current OCS data values for each of the Read/Only and Read/Write objects on the web page, requested by the WebMI Client running in the browser and provided by the WebMI Server on the OCS.
-
Heartbeat Messages – Ensure the browser connection remains active.
-
Without heartbeat messages – Mobile browsers will shut off the connection quickly to save bandwidth. This interval at which heartbeats are sent is set in Cscape as the Keep Alive Interval (ms).
-
Changed data values for Read/Write objects, transmitted by the WebMI Client on the browser to the WebMI Server on the OCS. These are typically sent on a change of state basis as the user clicks buttons and updates data objects on the web page. The interval can be delayed by setting the Publish Interval (ms) parameter in Cscape to a non-zero value, but this is not recommended.
Note:
-
License Agreement page will not be displayed if there are no user editable fields in the WebMI project.
-
If editable fields are configured in WebMI project, then License Agreement page will be displayed only once i.e., once user accepts the license first project page will be displayed, again if same user logs in then License Agreement page will not be displayed and directly first project page will be displayed.
Launching Web Pages from Any Browser
Open any web browser (IE, Chrome, Mozilla, Safari etc) from any device (iOS devices, android devices, windows devices etc). Give the IP address of the device (Same as FTP Target IP) on the address bar, once web browser connects to the device it asks for user credentials. Give the user credentials and follow the procedure from Step 3 as explained above.
Any changes made in the website will be reflected on the device and vice versa.
Return to the Top: Publish WebMI Pages
Publish to Removable Media 
Publish to Removable Media can be accessed under web of project navigator
The following windows will be displayed:
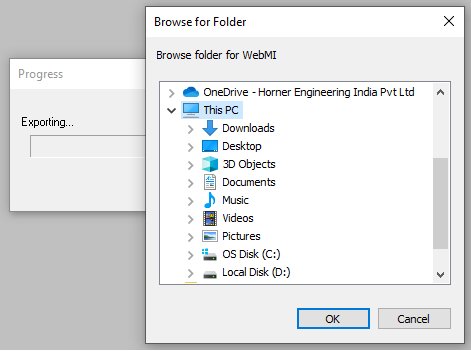
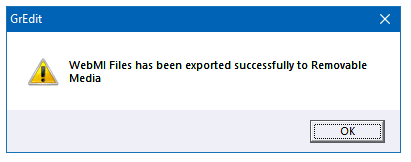
Browse the folder/removable media to copy the web pages. Once path is selected, click on OK. Progress bar window for exporting and publishing pages will be displayed. Once Web pages are copied to removable media, the following message will be displayed.
Return to the Top: Publish WebMI Pages